Can I Sew All the Layers of My Baby Quilt Pieces Together in Squares
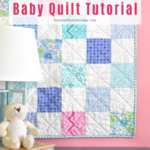
Within: The Ultimate Beginner'south Baby Quilt Tutorial
Making a baby quilt is easier than you retrieve when using v″ squares from a couple of pre-cut amuse packs. Since at that place is no cutting involved, your projection can be completely pieced in very trivial time.
It is the easiest way for a beginner to brand a quilt and too a fast way for a seasoned quilter to whip one up in an afternoon.
And, yous tin can make your own charm packs past cut down leftover fabrics from previous projects into 5″ squares making it a totalquilting win-win.
Want an ad-free, printable copy of this tutorial? Coil to the bottom of this post for more than details!
The Ultimate Beginner's Baby Quilt Tutorial
The Secret is Amuse Packs
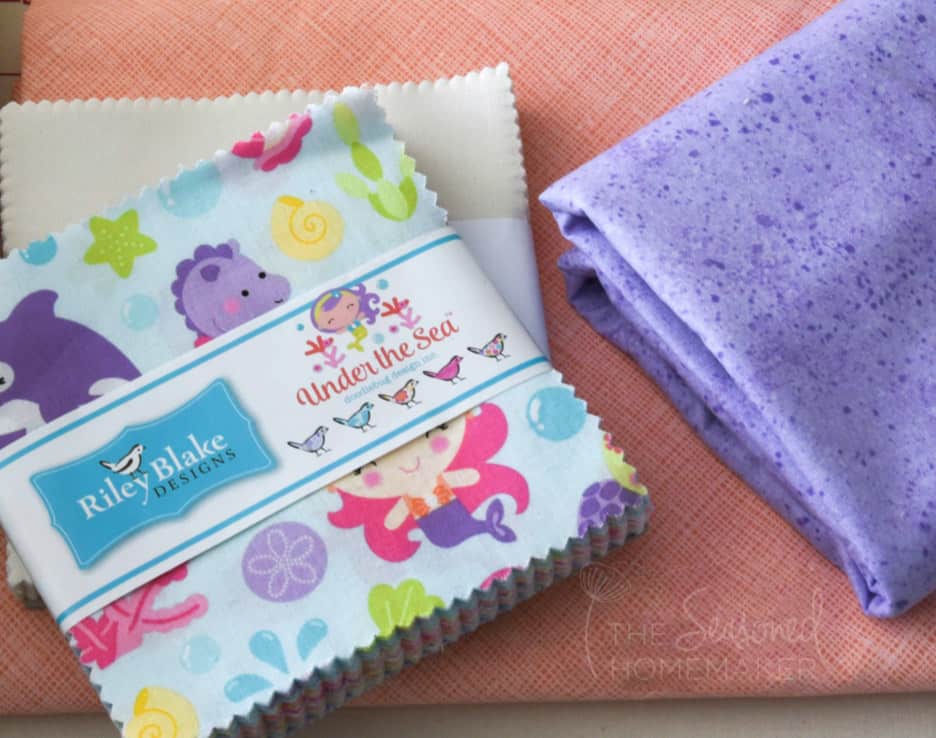
To simplify this quilt, yous will exist using amuse packs. If y'all're unfamiliar with amuse packs they are a sampling of a cloth collection that is assembled by material manufacturers.
Within the collection, these fabrics are color-coordinated and will likely have a large print, a medium impress, a small print, possibly something geometric, possibly something strip-y, and something with a small design. Most charm packs will have forty to forty-one 5″ squares.
The second type of pre-cut charm pack you will be using is a prepare of solids – preferably in a light color. This charm pack will comprise v" pre-cuts of the same fabric and will exist uniform throughout the entire quilt.
This site contains chapter links which won't change your price. Every bit an Amazon Associate we earn from qualifying purchases.
Pro Tip: I recommend Fatty Quarter Shop for charm packs.
- Choosing the fabrics for your quilt is a affair of personal taste. For this project you are costless to choose whatever printed fabrics you love. I recommend y'all choose a Print Amuse Pack that volition contrast with your Solid Charm Pack. This will brand the blueprint stand out a niggling better and add together involvement to your quilt.
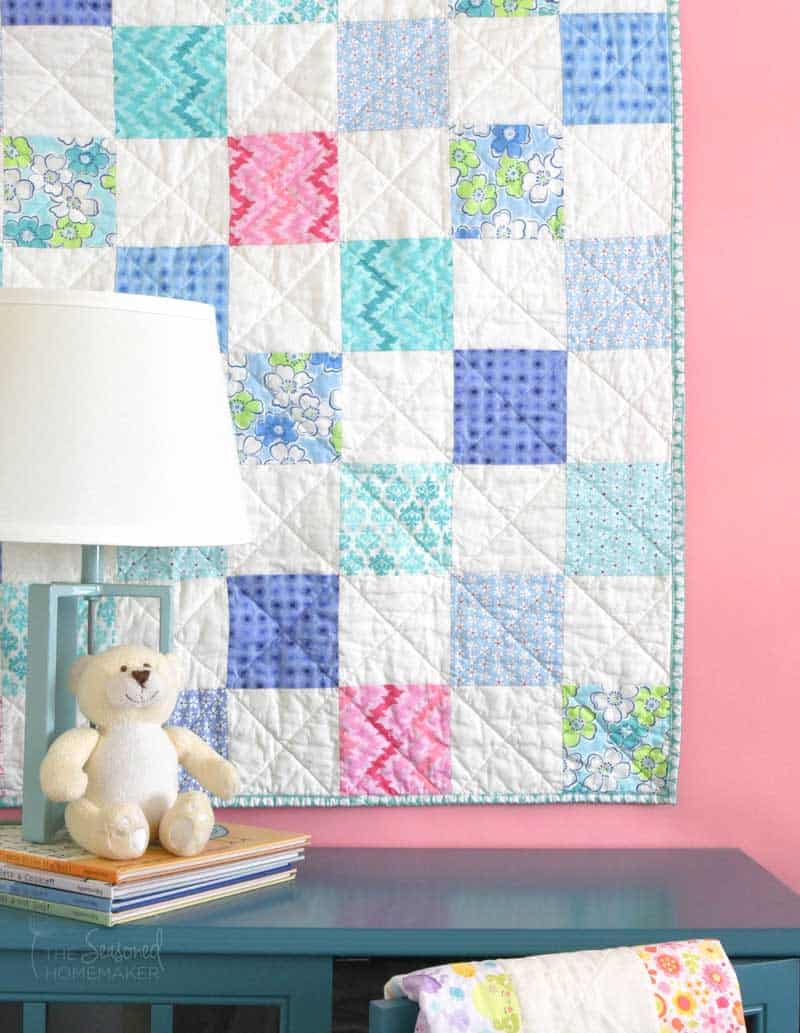
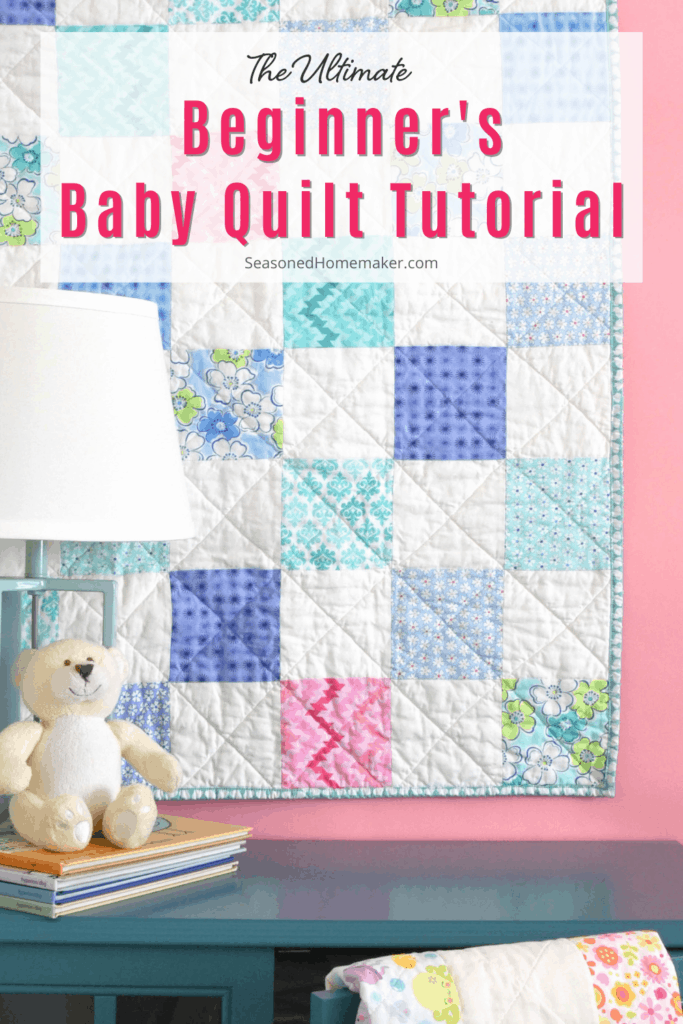
- This quilt uses 41 charm squares from the Printed Material and 40 amuse squares from the Solid Fabric. That ways the quilt peak consists of (81) 5" squares. In one case they are sewn together your quilt top should measure 40.5" x xl.five" – which is perfect for a infant crib.
- Most charm packs contain 42 charm squares. Make sure the charm pack you cull has at least 42 charm squares. Some manufacturers have started making smaller amuse packs with just 15-20 squares.
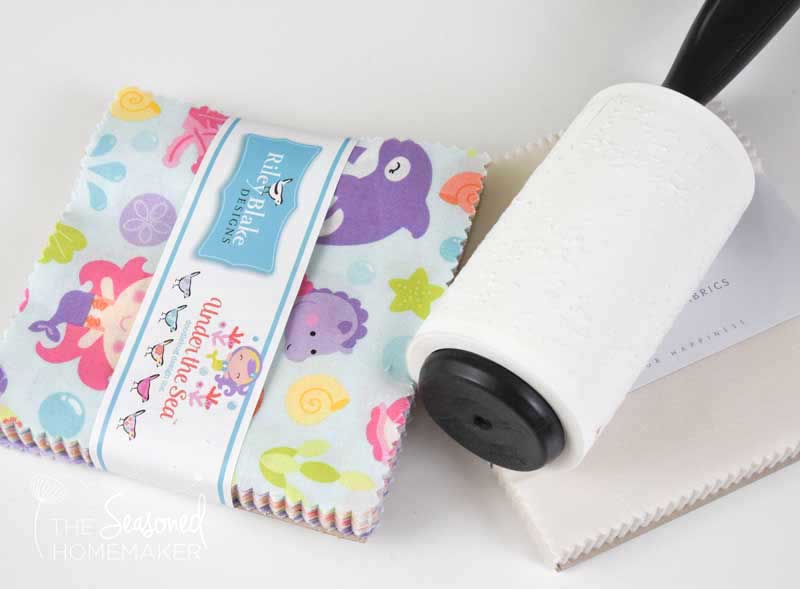
- Earlier tearing into your amuse pack you may want to take a minute and scroll over the edges with a gluey lint roller. When the charm packs are cut during the manufacturing process, in that location is a lot of lint left behind. Using a pasty lint roller helps eliminate some of the lint from invading your sewing area and clinging to your clothing.
- Many charm packs will be sorted in order from large prints to small prints or dark prints to light prints, etc. It is a adept idea to go through the Impress Amuse Pack and sort the designs. Y'all want to evenly distribute the fabrics so you don't end up with all of your large prints on i side of your quilt and all of your tiny prints down in the corner. Be certain to pay attending to the color value which is how lite or dark the fabric appears.
Gather Materials & Supplies
Materials
This site contains affiliate links which won't change your price. Equally an Amazon Associate we earn from qualifying purchases.
- (1) 5″ Charm Pack with 42 charm squares in a coordinating print fabric
- (ane) v″ Charm Pack with 42 charm squares in a analogous solid fabric
- 2-1/2 yards of quilting weight 100% cotton textile for the quilt back. I recommend choosing a print fabric, not a solid.
- 1/two 1000 coordinating fabric for quilt bounden
- 1 Package of Crib Batting – 45" x sixty" Note: 1 pkg. of twin bed batting will brand 2 babe quilts and can double as a design wall
Supplies
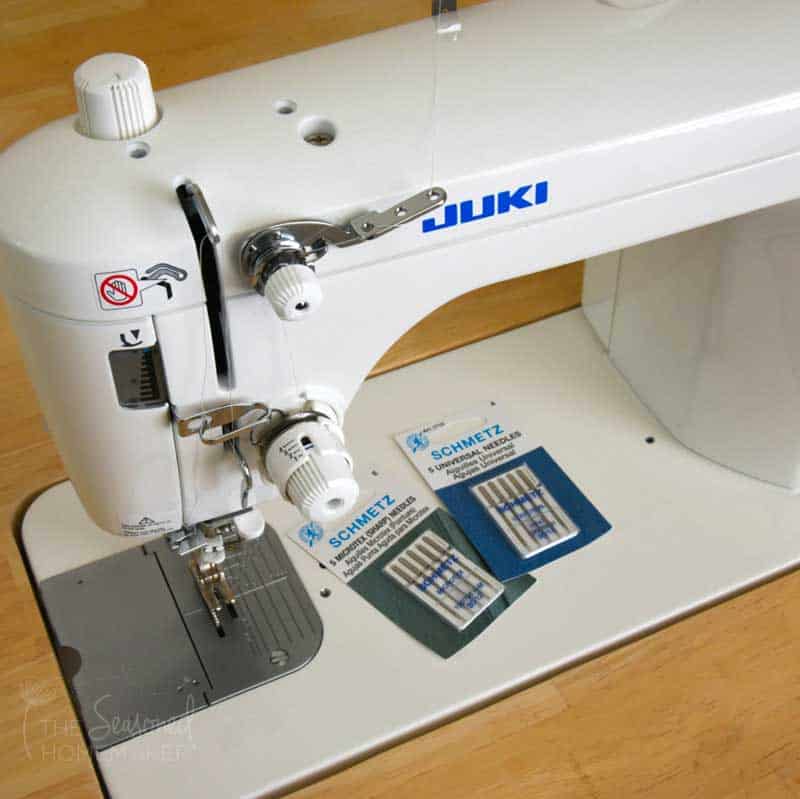
- Sewing Machine
- fourscore/12 Schmetz Needles for piecing
- 90/14 Schmetz Needles for quilting
- Straight Pins
- Wonder Clips
- #2 Basting Pins (Large i.5" )
- 1/4" Piecing Foot
- Walking Human foot
- Seam Ripper
- H2o Erasable Fabric Pen
- Self-Healing Cutting Mat
- Rotary Cutter
- Acrylic Ruler
- Scissors
- 50 wt. Sewing Thread in Neutral Color
- Iron and Ironing Surface
- Spray Starch
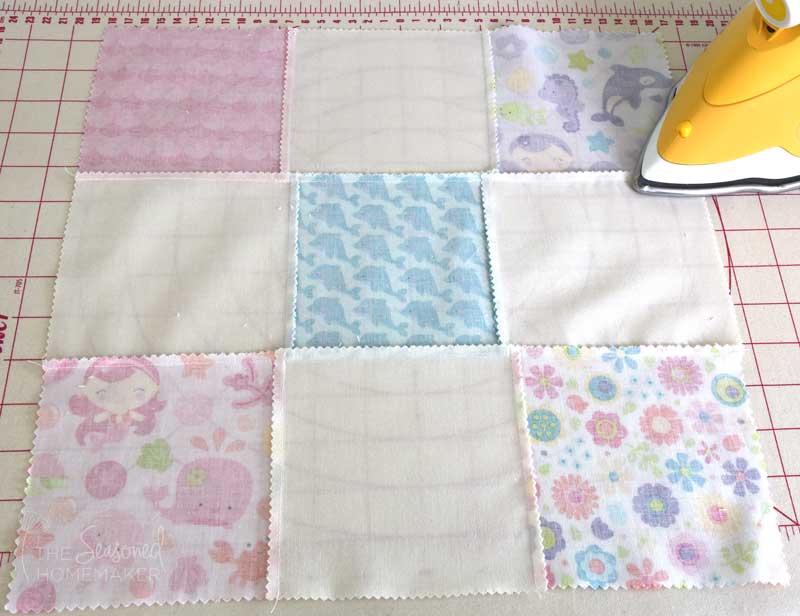
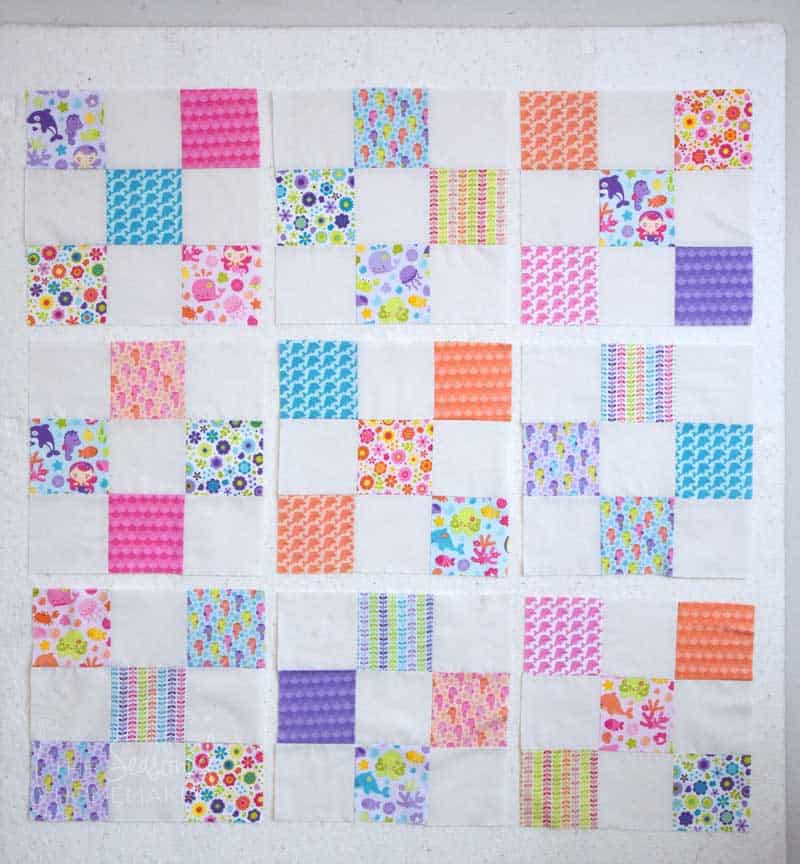
Step 1: Layout Your Design
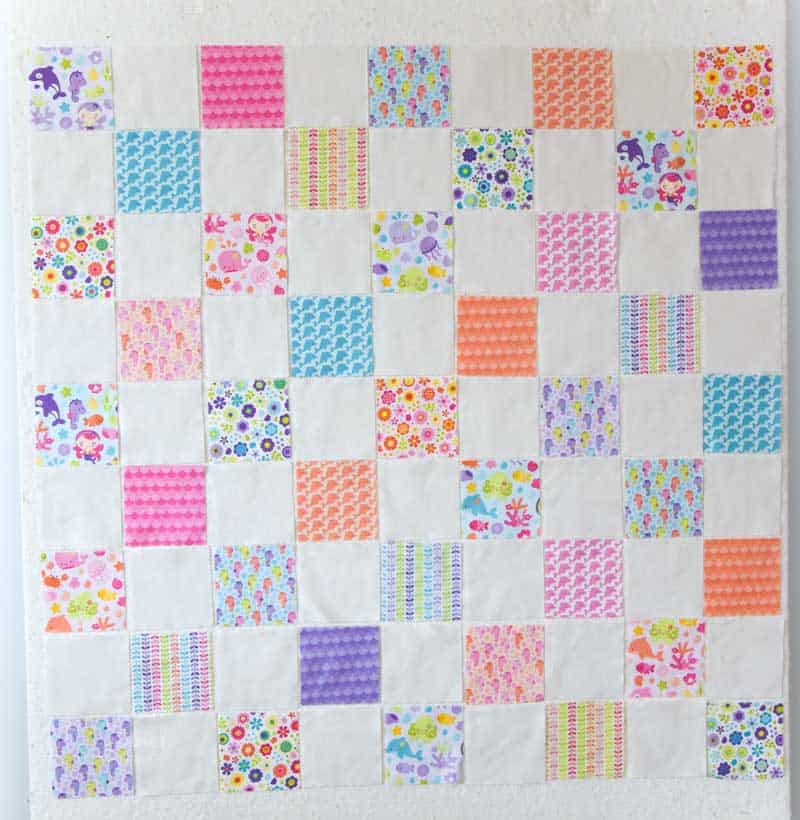
It's fourth dimension to layout your quilt. Observe a big plenty space that you tin layout and move around the charm squares until y'all get the right look. (tabular array, flooring, bed, etc.) You volition exist working with both print and solid charm squares.
When laying out, be sure to alternate print and solid material squares with ix squares across and 9 squares down.Annotation: Be sure to pay attention to the different colour values in the printed squares. Make sure that the different colour values are evenly spread effectually your quilt top.
- Row 1: Offset in the height left corner and place the starting time printed fabric square here. Add the next 8 squares on this row, alternating print and solid cloth squares.
- Row ii: Get-go in the meridian left corner and identify the first solid cloth square here. Add the next eight squares on this row, alternating print and solid fabric squares.
- Repeat Rows 1 and ii until all ix rows are consummate.
Pro Tip: Utilise your batting for a design wall. Just tape it to a wall and then layout your charm squares onto the batting to run across the placement clearly.
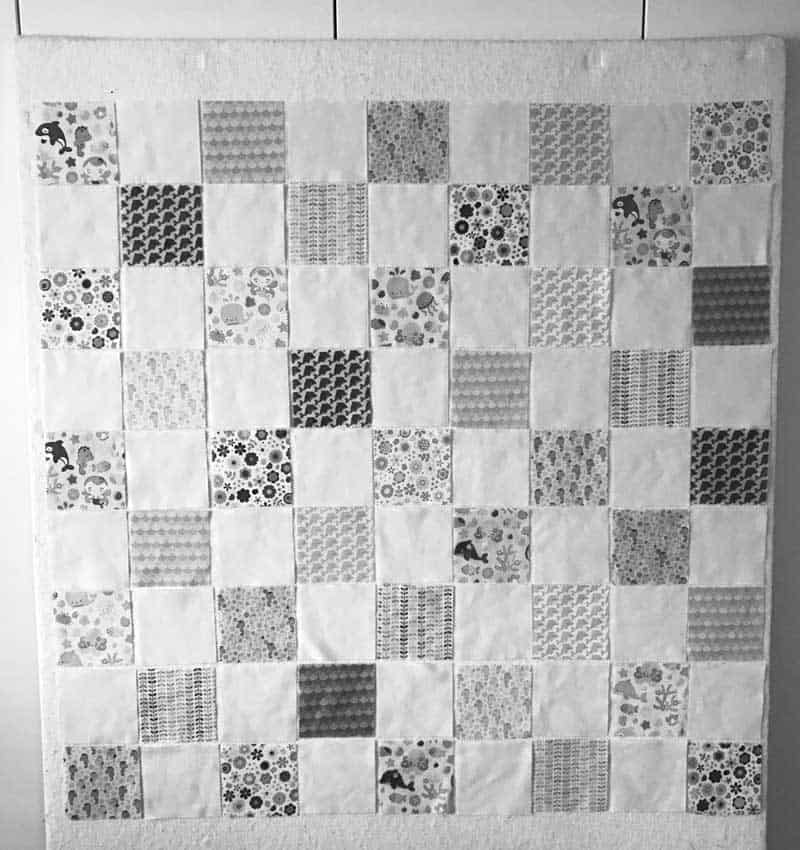
Footstep 2: Snap a Picture with Your Phone
Take a photo of your quilt layout. Y'all volition be able to see where you might need to adjust amuse square placements AND this will assist y'all remember where everything needs to go in one case you showtime sewing.
1 way to come across color value is to make the photograph blackness and white. This will make the differences in colour value stand out.
Keep snapping pictures and making adjustments until you get the desired look for your quilt top.
Step three: Piecing the Quilt
Seam Allowance Accurateness
Before getting started, I lets talk nearly seam allowance accuracy. Seam accuracy is a quilting skill that needs to be embraced from the beginning.
If each of your seams are off past equally trivial as i/32" it will adjust the overall size of your quilt. If your seams aren't consistent and are off by varying amounts such every bit ane/viii", ane/16", or fifty-fifty 1/32" you will have difficulty when you start connecting the blocks.
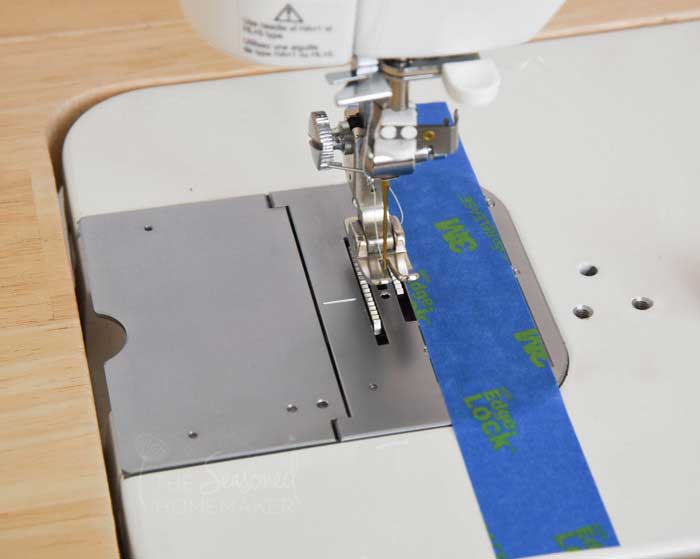
There is good news considering an accurate 1/4″ seam allowance isn't difficult to achieve. Piece with a i/4″ footand/or a piece of painter's tape to go those accurate seam allowances.
Read more about achieving a perfect seam allowance in my mail:How to Sew the Perfect Quilting Seam Allowance.
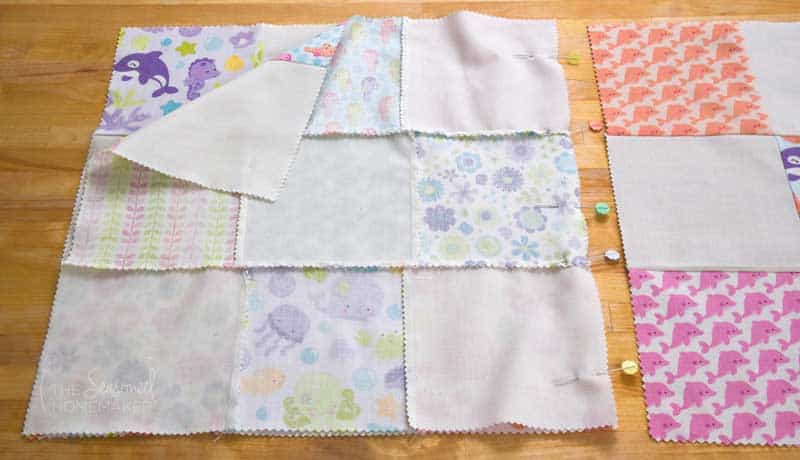
Organize Amuse Squares for Sewing
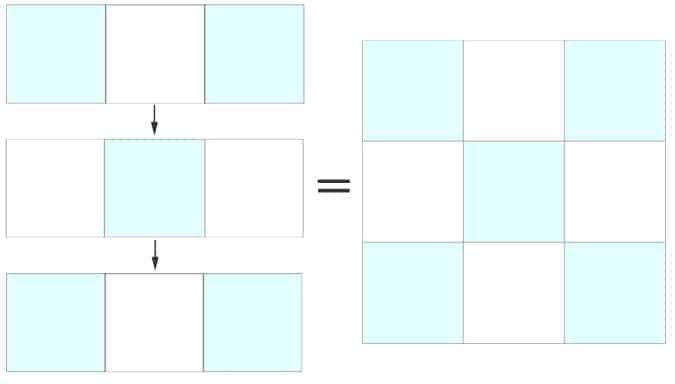
There are several ways to piece a quilt. However, we are going to use the 9-patch method. I chose this item method so you could learn how to create a 9-patch quilt block then connect it into pieced rows.
Using 9-patch blocks volition allow you to see how individual blocks are synthetic, which is typical when making well-nigh quilts.Note: Once you lot master the 9-patch block, you'll be equipped to brand any size quilt out of any fabric!
You volition need an orderly way to assemble up your charm squares and so correctly place them at the sewing machine. It's and then like shooting fish in a barrel to get lost in this – and then working with three charm squares at a time will assistance you ready up your ain system for keeping your design organized.
One mode I like to do this is to stack the iii charms that will form a row from left to right. Doing this helps me meet the placement of the squares.

Making 9-Patch Blocks
Prepare your stitch length to 2.0mm. Having a smaller run up length ways you don't have to backstitch at the kickoff of each seam.
With Right sides together place the lighter cake on top of the darker block. Pin together at top and lesser.
Marshal the right edge of the pieces with your 1/4" foot or the tape you've placed onto your sewing machine.
Pro Tip: The pinked or "sawtooth" edge is where you line up your 1/4" foot. That is the outside edge.
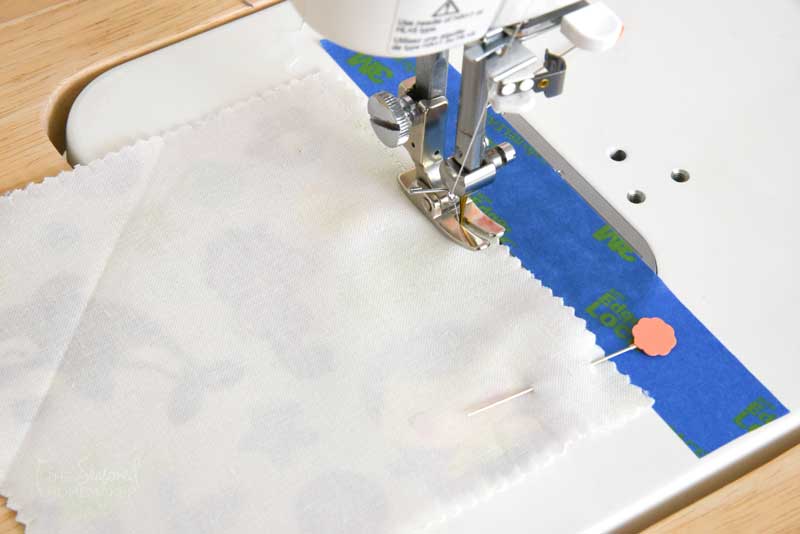
Begin stitching downwardly the correct side using a one/four" seam assart. The feed dogs volition pull your cloth through. Remove pins BEFORE y'all run up over them. Let the cloth feed through the machine.

Once three individual blocks are attached across they will create a strip. The nine-patch grid works best when it is washed in an alternating grid. The first row should exist Dark Square + Light Square + Dark Square.
The second row should exist Light Square + Dark Foursquare + Light Foursquare. The third row should echo the first.
In one case you've created your three alternating rows, it'due south time to press.
Pressing the Seams
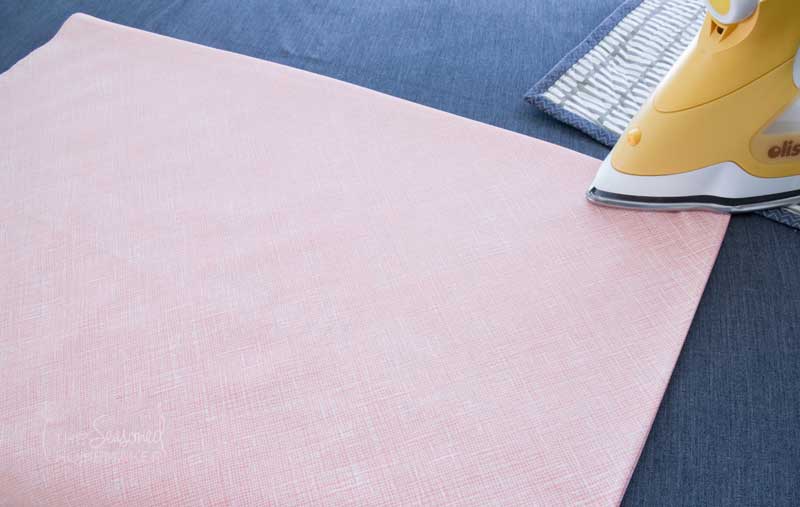
The manner yous press your seams matters! You don't desire to over-atomic number 26 the seams because it will stretch out the fabric and alter the size of your block. Instead, yous desire to press down on them.
Considering you're using a print fabric and a calorie-free solid material, it'south always best to printing the seams towards the darker material when possible, or in this case the printed textile. This is called Pressing to the Nighttime Side.
You Do Non want to printing the seams open up. That will weaken the quilt'southward seams and they could later come open. E'er press seams in 1 management – preferably towards the darker textile.
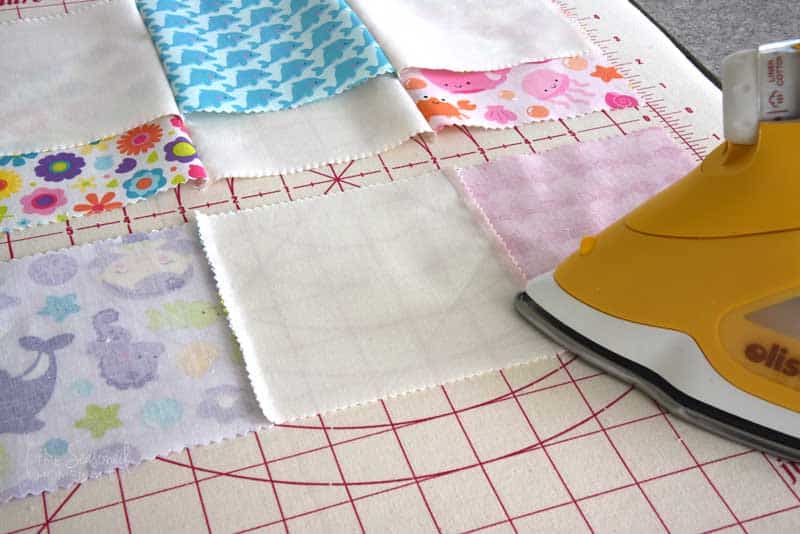
Alternate the pressing management on each row past pressing Row ane seams to the correct, Row 2 seams to the left, Row 3 seams to the right.
When you alternate the seam management it reduces seam bulk when stitching the rows together. Printing from the dorsum of the quilt blocks – pressing the seam towards the darker textile when possible.
Lightly spritz with spray starch on the forepart and give each row one last press then identify them back in social club on the blueprint wall or other layout infinite.
Step four: Making a 9-Patch Block
Nesting Seams
Before you can connect the rows you need to empathise about nesting seams. Because we pressed 'to the night side' your seams will alternate and 'nest' when you pin the rows together. This is platonic because it creates less bulk in the quilt.
Pin the top row to the second row, matching the nesting seams. Pin at the seams. Pin at the starting point, centre of each cake, and at the terminate.
Pro Tip: In that location is a natural shifting of the layers when you lot stitch across intersections. Information technology is important that your intersections are pointing towards the needle, on the top, equally it approaches the machine. You will accept a better lock on the seams. It'south natural to think that stitching over seams pointing away from the machine is easier. That's simulated, the layers tin can shift and the matched seems will be off.
Slowly stitch across, make sure to remove pins as yous run up.
Pin the tertiary row to the second row in the same manner and run up.
Press the Connecting Rows
To keep this process fast and easy, I recommend you press your connecting rows in an alternating way. That ways, on the first cake press up, the second block printing downwardly, the third block press upward. Alternate when attaching Rows two and three.
Congratulations! You at present accept ONE completed block. You will need to sew viii more. Be sure to sew accurate 1/4" seams. This will insure your blocks become together correctly.
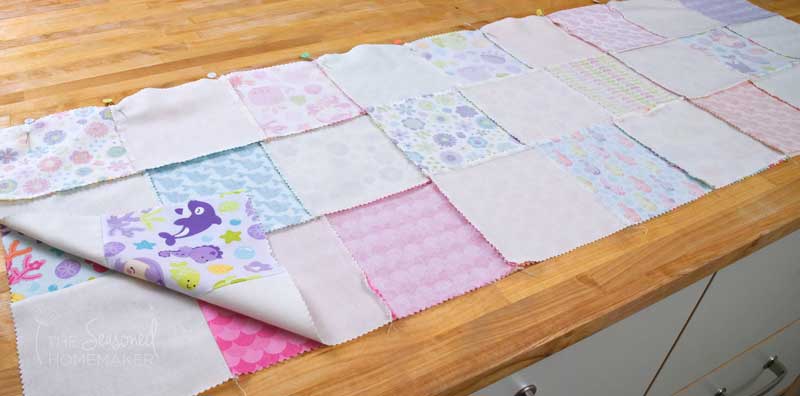
Step 4: Connecting Blocks into Rows
You now have nine same-sized blocks laid out and ready to connect into rows. Each row will consist of iii blocks. You volition exist attaching the three blocks to create rows.
Get-go Row:
- Lay Block 1 and Block 2 Correct sides together, matching up the nested seams. The seams should nest perfectly because you accept alternately pressed each block, they should easily course nesting seams. If not, re-printing them correctly.
- Run up using a 1/four" seam assart. Practise NOT PRESS yet!
- Add Cake 3 to the above, carefully pinning at intersections. Sew together using a 1/four" seam assart. You have at present created your start row.
- Press the seams in i direction. For case, Press Row ane towards the left.
- Proceed in this way creating Row ii and Row three. Press these intersections in alternating directions. Row ii towards the right, Row 3 towards the left.
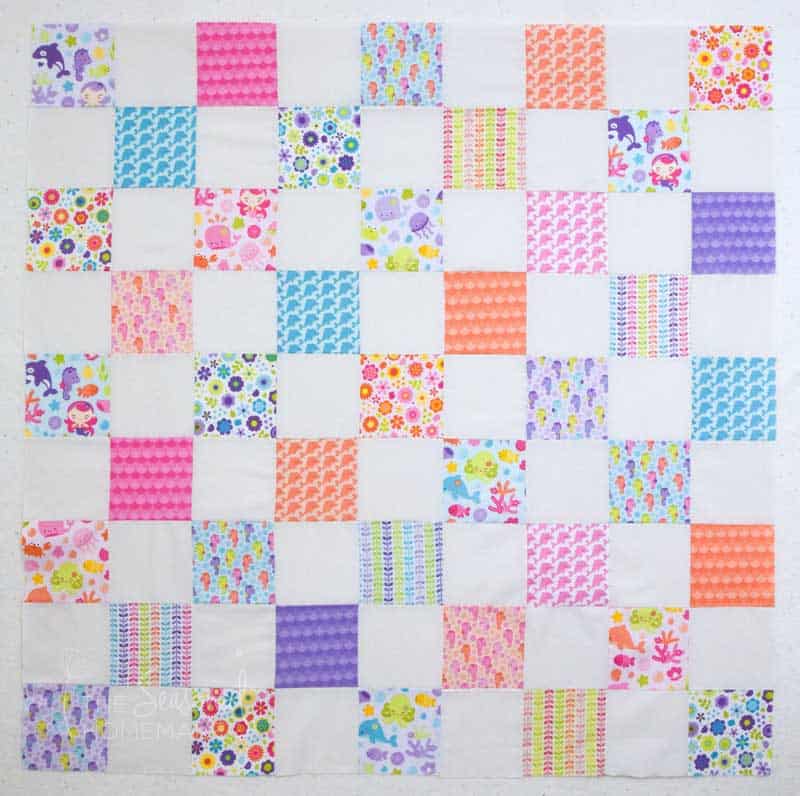
Pace 5: Creating the Quilt Summit
This is where the quilt top comes together. When you connect the 3 rows you will accept created a finished quilt top.
- Pivot Row 1 to Row two, matching up all of the intersections. If you've pressed carefully, all of your seams should create nesting seams.
- Be certain to check for whatsoever open seams and repair, if necessary.
- Using a 1/four" seam allowance, stitch the ii rows together paying special attention to each intersection.
- If you lot get one or ii intersections off a niggling, just unstitch a fiddling on either side, line them up properly, and re-stitch.
- Pin Row three the the above and stitch in the aforementioned style, carefully watching every bit you stitch over intersections.
- Press the top row up and the lesser row down.
- Fold the quilt summit into quarters and press in a crease. (This volition be used afterward in Step eight.)
Stride 6: Preparing the Quilt Back
- Quilt Bankroll fabric should be, from selvage to selvage, 44" wide. Information technology's best to choose a not-directional fabric for your get-go few quilts. Things like stripes can be difficult to friction match. Note: It may be necessary to add a slice to the side to make information technology wide plenty for quilting.
- Cut off the selvages.
- Cut textile to be 44" wide x 45" long. Ideally, your textile should be three-4" wider around each of the sides of your quilt top. Note: Bigger is non better. If you cutting your backing also long or wide information technology could become caught in the quilting and crave removing stitches.
- Printing Quilt Bankroll fabric.
- Fold in half, from selvage to selvage, and press in a pucker.
- Fold in half once more to create quarters, and press in a crease. Set bated.
Step 7: Preparing the Batting
- Crib size batting is 45" x 60" broad. Cutting the length to 45". Y'all'll now take a piece of batting that is 45" x 45".
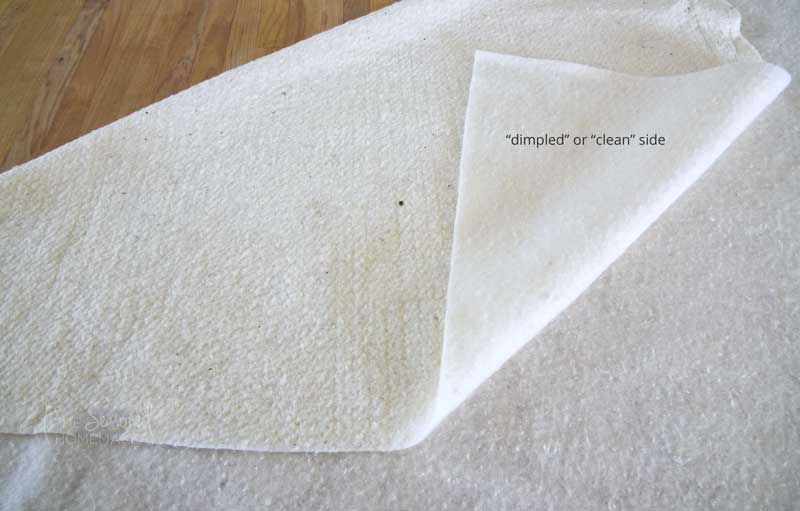
Batting Tip: There is a right and wrong side to batting. The side with the "dimples" is the right side and it should face the wrong side of the quilt top. If you lot're using Warm & Natural batting, the side that doesn't appear "muddied" is the right side and it should face the wrong side of the quilt meridian.
- Fold in half and then fold in one-half again creating quarters. Note: Do not printing the batting. If it has a polyester (and well-nigh do) it could melt under the heat of an atomic number 26.
- Find the heart indicate and marker with a pin or water erasable pen.
Step eight: Preparing to Quilt
Brand a Quilt Sandwich
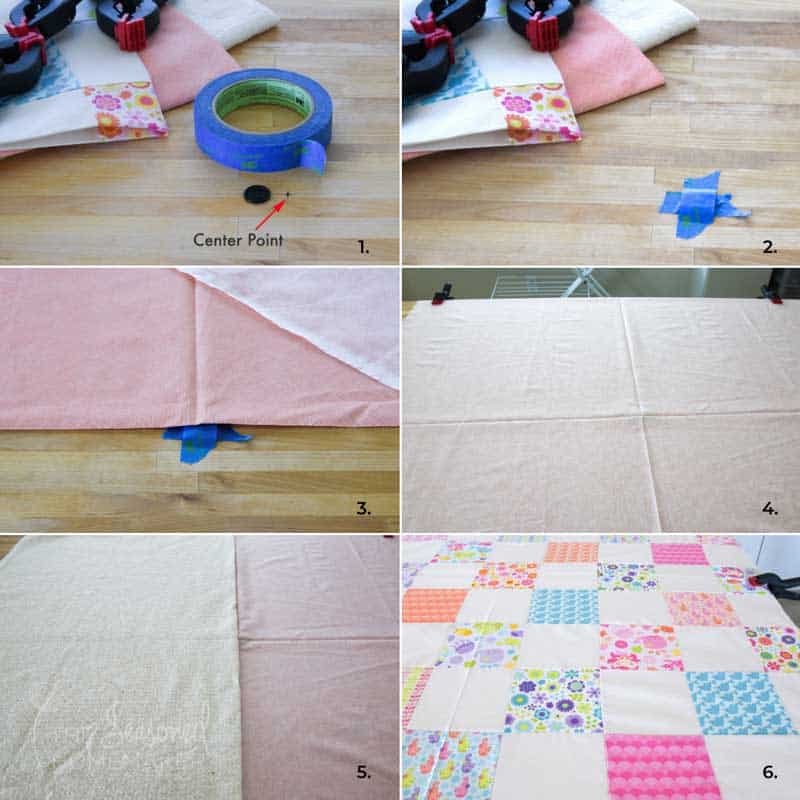
- Using a flat surface such as a table or the floor, notice the eye point and tape a large button in identify with painter'south tape. This will be your center mark for laying out the quilt.
- Layout the Quilt Back with the RIGHT side DOWN. Unfold from the center point and smooth.
- Using either clamps or tape, secure the Quilt Dorsum to the flat surface. The fabric should be tight but not taut.
- In the aforementioned manner, layout the batting. Remember to face the "dimpled" side towards the Quilt Top.
- Smoothen out any wrinkles and clamp or tape to concord both the Quilt Back and batting. The batting should exist even with the Quilt Backing, trim any backlog.
- Find the center push button and layout the Quilt Acme Right side facing up.
- Smoothen out whatever wrinkles and either tape or clench. Smooth equally you go. Be certain the entire quilt sandwich is tight, non taut. Work your hands across to experience for wrinkles. Polish from the heart out towards the corners.
Pro Tip: There's a faster, easier way to baste a quilt. Lookout this brusque video below to acquire how.
This site contains affiliate links which won't change your cost. As an Amazon Associate we earn from qualifying purchases.
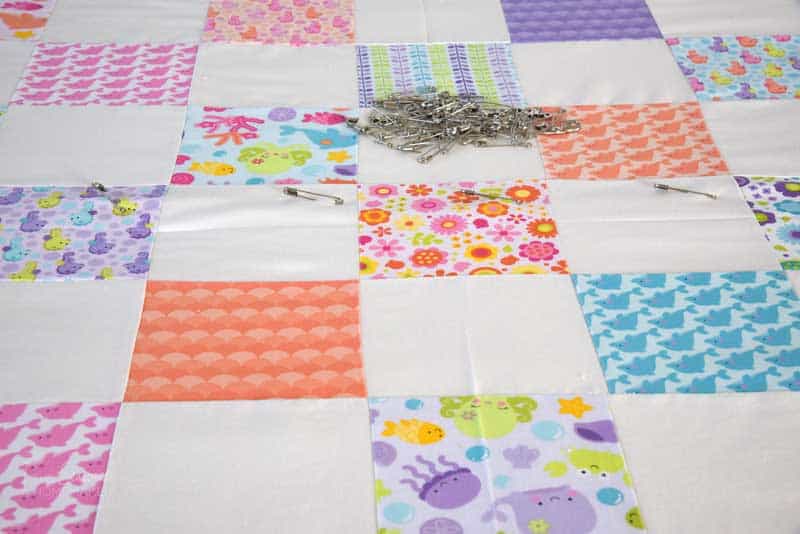
Pivot Basting the Quilt Sandwich
- Y'all volition need to secure the three layers in society to quilt them. This is called Basting. One of the simplest and most cheap means to do this is with Quilt Basting Safety Pins.
- Since the quilt is already laid out, you can start pin basting.
- When pinning quilt layers together yous desire to be conscientious in society to avoid having the backing shift or become loose when quilting. Check for lumps and bumps as you are pin basting. Continue smoothing as yous pin.
- Start pinning from the centre, and smooth every bit you lot go. To avoid having to continually unpin as you quilt, add together basting pins to each of the quilt squares in the top right corner. Note: If all you take is 75 basting pins, you lot will need to adjust somewhere.
- Once the quilt is pin basted, you can remove record and/or clamps.
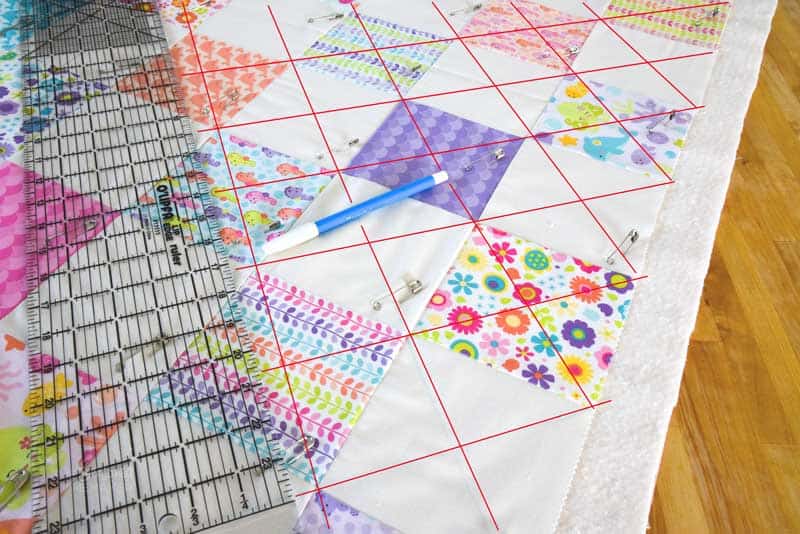
Marker the Quilting Lines
- Using a h2o erasable textile pen, marking your quilting lines diagonally, from corner to corner, in both directions. Don't be in a bustle – these are your quilting guidelines and need to be accurate for you to follow.
- Another selection for mark quilting lines is to use bluish painter's tape on the right border. Either of these options works well for getting directly stitches.
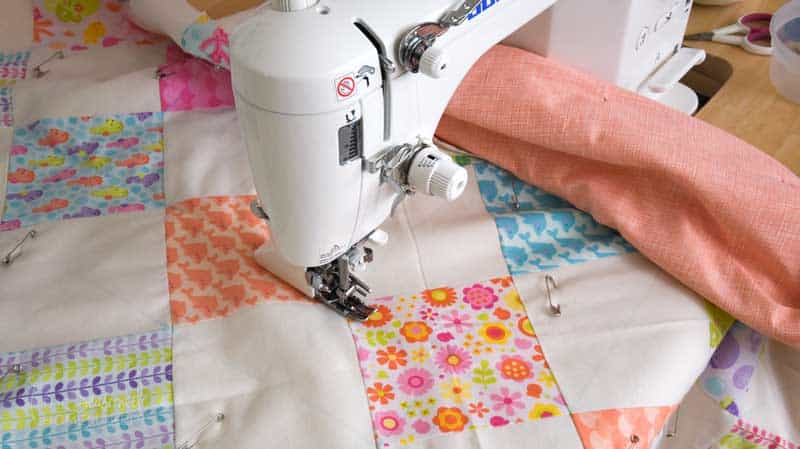
Step nine: The Quilting Process
Quilting
Pro Tip: Apply a Walking Foot if y'all have ane available.
- Before you brainstorm quilting, exist sure your chair and sewing surface are at a practiced height for yous sewing auto. You don't want to exist reaching up or slumping over.
- Some people like to utilise Quilting Gloves. They aren't necessary for this project, but feel free to use them if y'all have them. They will assistance you have a good grip on your quilt.
- Set your stitch length to 3mm.
- Begin Edge to Border quilting in the top left corner and run up down your mark lines slowly and carefully. Back stitch in the batting at the beginning and cease of each quilting row.
- If you've pinned correctly, you won't take to remove very many pins as you are stitching.
- Continue stitching from corner to corner in the blocks. Do one row of stitching at a fourth dimension.
- Turn the quilt, and complete the next row.
- The blueish markings will show up really well in the white textile, but may be a piddling hidden on your printed fabric. If yous go slowly, you shouldn't have a problem with this. You can ever add a piece of painter'due south tape to squares that don't have visible marker lines.
- Take your time, do i or ii rows at a time, accept a break, then come up back to it.
- One matter to watch out for is intersections. This is where yous're probable to create a bump. If you lot're going slowly you can see these forming. Simply, stop, re-adjust your hands and the cloth. No more bump!
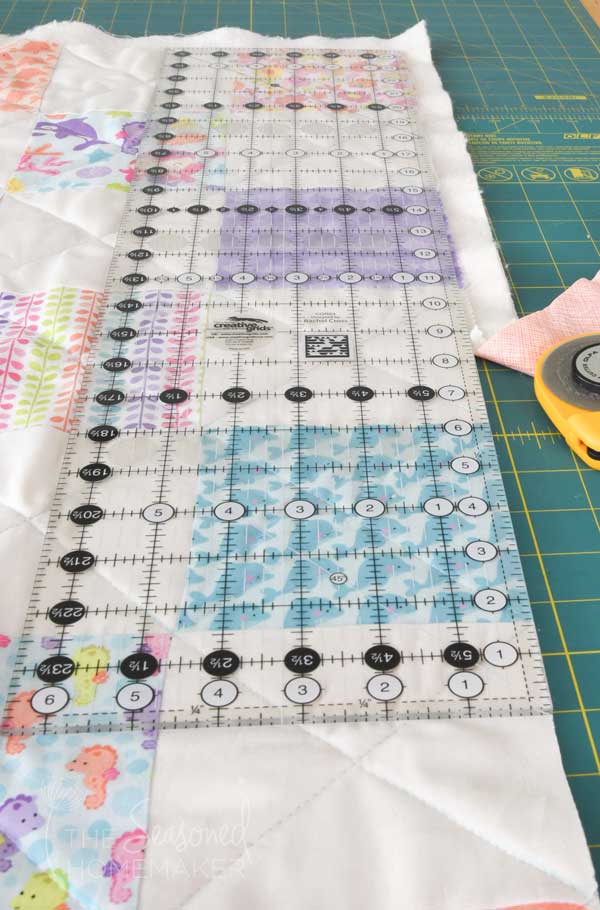
Squaring the Quilt
- Once y'all've finished the quilting you lot will need to trim off the excess backing and batting. This is called squaring the quilt.
- With your acrylic ruler, line up against a straight seam and trim off the excess. Exercise this on all 4 sides of the quilt.
- Take your time, yous don't want to trim downward the quilt too much.
- Once you lot've finished squaring the quilt, have a water-filled spray bottle and mist the quilt to remove the blue marks. Let it air dry out completely before going on to the next stride.
Stride ten: Bounden the Quilt
Making Straight Edge Binding
- Audition textile for the binding by laying it below the quilt to come across what works all-time. Sometimes the same fabric is prissy considering it blends; other times you may want it contrast. For your first quilt I recommend something that blends rather than contrasts.
- Binding is cut across the width of the fabric in 2.5" strips. You will need to make up one's mind how many strips needed in order to bind the quilt.
Binding Formula
- My formula is this: The sum of all four sides of the quilt plus 12-18". My quilt is 41.five" on each side – multiplied by four is: 166". I'll need to add together 12-eighteen" inches more to that amount. Adding 18" means I will demand 184" of 2.five" binding strips.
- The width of your material should be about 44", including the selvages. By dividing 184″ x 44″ (or the width of your fabric), I'll need 4.25 strips.
- That means I'll demand to cut 5 strips, ii.five" broad. Note: In one case you've finished bounden your quilt, there will exist some left over. Save it and brand a mug carpeting!
Pro Tip: Pre-cut 2.5" strips are perfect for making bounden. All you need are five pre-cutting strips to bind this quilt!
- Trim abroad the bind selvages.
- With WRONG sides together, press the bounden strips lengthwise. This is actually helpful when you're working with a solid fabric, simply it's also a good habit to take for future quilts.
Make the Binding
There are ii ways to attach binding strips.
Option 1
- Friction match up the binding stips and, using a 1/4″ seam assart, run up a straight seam. It's very like shooting fish in a barrel and works keen for beginners merely does create a little bulk in the binding. Annotation: I recommend if this is your beginning quilt.
Pick 2
- Match the strips up RIGHT sides together and so they form a right angle. And so, from corner to corner, draw a right angle using a ruler and h2o erasable pen. Pin to hold. Sew together across the diagonal line.
- Trim the seam allowance to one/iv″.
- Continue attaching strips until there is enough to demark your quilt.
In one case all the strips are fastened, printing the seams open. This volition reduce majority. It's the in one case on a quilt that it's ok to press open the seams.
With Incorrect sides together, press the binding strips lengthwise. When all the seams are pressed, re-press the entire binding so it is nice and flat
Machine Binding
Time for a piddling quilting controversy. Do you want to hand demark or machine bind your quilt?
Since this is a baby quilt, I recommend machine binding. Any quilt that gets heavy apply should use car binding.
Pro Tip: If you plan to enter a quilt in a local quilt prove, it will demand to be hand bound.
I have an entire tutorial on the bounden process. Within the tutorial is a video and a way to download a pdf with all of the instructions.
Since binding has some very specific details, y'all will want to pay close attention to the details in the tutorial. You lot'll acquire how to become perfect corners and a way to hide the final seam that connects the binding.
Click the button below to learn how to demark your quilt.
Voila! You at present take completed a baby quilt AND learned everything yous need to know to move forward on your quilting journey.
>>> Desire a printable version of the mail service? Click the pink button, and download the Printable PDF instructions.
I recommend you lot begin to abound your quilting skills past making a few blocks. These blocks are designed to teach you how to teach you different techniques and improve your quilting skills.
Easy Quilt Cake Tutorials
More Beginner Friendly Quilting Projects
Pivot this epitome for later.
Source: https://www.seasonedhomemaker.com/beginner-baby-quilt/
0 Response to "Can I Sew All the Layers of My Baby Quilt Pieces Together in Squares"
Post a Comment